Scrolling Screenshot On Mac

Three ways to capture any scrolling screen on Windows
If you want to capture a long screenshot of your screen, but not just a web page or browser, then you need to use specialized software that allows you to take multiple snapshots. It could be a spreadsheet, a lengthy MS Word document, or anything else for that matter. Here are some suggestions to help narrow your search and find the best screen capture tool for your requirements.
Snagit, a screen-capture and image editing program developed by TechSmith is powerful. It allows you to capture a long screenshot on PC and record screen activities, and edit, annotate, and share them with ease. Snagit allows you to capture screenshots of web pages, documents or scrolling windows.
The process of using Snagit is given below:
Set up Snagit. Set Up Snagit.
Install Snagit on your Windows PC. Click on Image in the left panel to launch the software. Choose Scrolling Window from the Selection drop-down list. You can enable or disable buttons to the right of the Snagit window.
Take a screenshot of the scrolling screen. Step 2.
Click the icon to open the window or app. Make the Snagit panel active (by clicking its icon from the taskbar), and click Capture. When an orange arrow appears, click it and wait while Snagit automatically scrolls the screen and captures a long screenshot on Windows.
When the Snagit Editor window opens, use the tools on the right to annotate the image (optional), and then go to the File menu to save the long screenshot on PC.
Unique features of TechSmith SnagIt:
- Multiple capture modes allow you to capture screenshots, scrolling webpages, video recordings, and even animated GIFs.
- Snagit's editing tools include image cropping, text and shape overlays, resizing, and color adjustments.
- There are many templates, pre-built components, such as buttons, callouts and arrows that can make designing easier.
- It is integrated with Microsoft Office, Google Drive and Dropbox. This makes it simple to collaborate and share screenshots and recordings.
ShareX is a free and open-source screen capture and file-sharing software for Windows. ShareX allows users to take screenshots or videos on their laptops, then share these via various platforms such as Imgur or Google Drive. The software also includes hotkeys, shortcuts and other features to simplify the process of capturing and sharing.
Below are the detailed instructions for using ShareX:
Prepare Your Windows. Prepare Your Windows.
Open the window, app, or web page for which you want a long scrolling screenshot. Launch ShareX.
Step 2. Begin Capturing the Screenshot.
Click Capture on the ShareX window and scroll down to the Scrolling Capture submenu.
On the Capture tab of the next window, click Start scrolling capture from the lower section. Wait while ShareX automatically scrolls the window and captures a long screenshot on PC.
Click Upload/Save depending on whether you want to save the screenshot locally or upload it online after the capture.
Unique features of ShareX:
- You can create custom workflows to automate repetitive tasks. This makes it faster and easier to take screenshots and other content.
- ShareX has a built-in OCR (optical character recognition) feature that can recognize text within images and screenshots.
- ShareX also allows you to upload your screenshots to a wide range of services like Imgur, Dropbox, and Google Drive. You can even configure ShareX to upload content to your FTP or SFTP servers.
- ShareX provides several capture options beyond just taking screenshots. You can take screenshots or videos and even GIFs.
DemoCreator, a Wondershare screen-recording and video-editing software program, allows you to record your computer's desktop as well as audio. This program lets you record your screen, audio and video and produce professional videos that can be used for education or instruction.
You can add effects, annotations and captions to videos. It has a variety of tools for editing, including trimming and cutting, adding voiceovers or music, and changing the colors and contrast. You can use these features to enhance and embellish your videos. DemoCreator is easy to learn, as the interface and options are intuitive.
You can use DemoCreator to capture a scrolling screen by recording a video and saving it as MP4 or GIF. The process is given below:
Step 1. Launch the Screen Recording Panel.
Download and install Wondershare DemoCreator on your Windows PC. Click All-in One Recorder on the first page to access the screen recording panel.
Step 2: Define Recording and Editing Preferences. Step 2.
Use the options available in the panel to define recording resolution, capturing style, audio and webcam recording, and whether or not DemoCreator should launch the video editor once you stop the recording.
Open the window, app, or web page that you want to long capture. Click REC on the DemoCreator panel at the top to begin recording. Then, move the window to either side as required.
Once done, click the Stop icon from the floating toolbar to stop the recording and wait while the video editor launches automatically (if you configured DemoCreator to do that).
In the video editor, use the available tools to fine-edit the footage according to your preferences, and click Export from the top-right to export the output in your preferred format.
Good News Here: although you can scroll a window while recording your computer screen with DemoCreator, the scrolling screenshot in Windows and Mac versions of the app is in the development phase and will be added soon.

How To Use Movavi Screenshot Chrome Extension
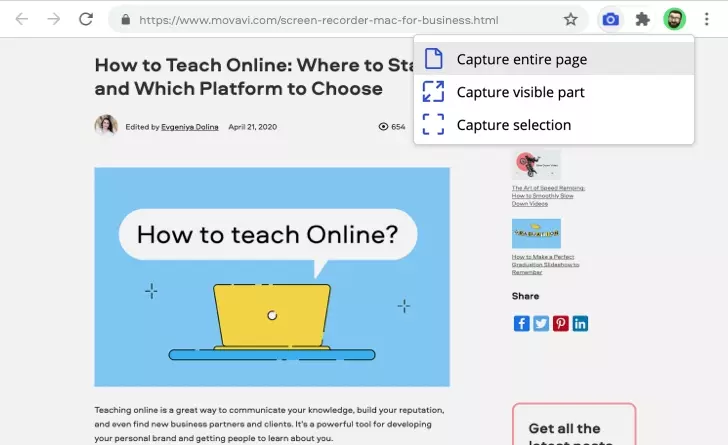
Movavi Screenshot Chrome Extension allows you to take screenshots of Mac scrolling pages. Movavi Screenshot Chrome Extension is similar to GoFullPage in that you need only add it to your browser. Use it by following this guide:
- Launch Google Chrome and go to the Movavi Screenshot Chrome Extension page on the Chrome Web Store.
- To add the extension to Google Chrome, click "Add to Chrome".
- You will be asked in a popup if you would like to add the Movavi Screenshot Extension for Chrome. Click on the "Add extension" button to continue.
- A pop-up will ask you if you want to add Movavi Screenshot Chrome Extension. Click on the "Add extension" button to continue.
- Click on the Puzzle Piece icon in the upper right corner of Google Chrome to open the Extensions tab. To make it easier to access, click on the "Movavi Screenshot Extension Chrome Extension" pin icon.
- Click on the Puzzle Piece icon in the upper right corner of Google Chrome to open the Extensions tab. Click on the pin icon to the right of "Movavi Screenshot Chrome Extension" to pin it for easy access.
- Visit the web page you want to take a scrolling screenshot of.
- Go to the page that you wish to capture a screenshot.
- At the top right of your browser window, click on the Movavi Screenshot Chrome Extension camera icon.
- Click on the Movavi Screenshot Extension Chrome Extension icon at the upper right corner of the browser window.
- Click "Capture the entire page" in order to capture a screenshot.
- Select "Capture entire page" to take a screenshot of the whole web page.
- The extension will process the picture. You'll then be taken to a tab in which you can download and view the screenshot.
- Let the extension process the image. You'll then be taken to a tab in which you can download and view the screenshot.
- In the new tab, click on the "Save JPG" button to download the image.
- Click on "Save JPG", in the new tab to download an image.
- Click on "Allow" when the extension asks you for permission to download.
- When the extension asks for your permission to manage your downloads, click on the "Allow" button.
- Click "Save" to save your screenshot. Rename it, choose a destination and then select the desired location.
- Rename your screenshot, select a save destination, then click on "Save."
- The image will be in the location that you chose when saving it on your Mac. In the above example, we are saving the screenshot to the "Desktop" folder.
- The image will be in the location that you chose when saving it on your Mac. The screenshot is saved to "Desktop".
You can take long screen shots on Windows with 3 browsers
Windows offers many options for taking a screen shot, including pressing Fn +PRTSC and Ctrl+PRTSC. In addition, Windows 10/11 has a built-in Snipping Tool to take screenshots. But all the methods cannot help you take long screenshots on Windows. How can you take long screenshots in Windows? You can take screenshots of a web page using some browsers. Here are three common browsers for you:
1. Google Chrome
Use a GoFullPage browser extension to take large screenshots in Google Chrome. This browser extension can capture an entire web page that you are viewing in your browser. This is the complete guide on how to install and use GoFullPage.
Go to Chrome Web Store and search for GoFullPage. Click the Add to Chrome button.
Click the GoFullPage button in Chrome's toolbar to switch to the page where you wish to capture long screenshots.
After taking a scrolling screenshot, you can edit and download the screenshot either as a PDF or PNG file.
2. Mozilla Firefox
Mozilla Firefox is the only other browser that has this integrated feature. So, how how to take a scrolling screenshot with Mozilla Firefox? Below are the steps:
Step 1: Click the three-lined menu icon at the top right, and then click More Tools > Customize Toolbar.
Step 2: Find the Screenshot icon and drag it to your Firefox toolbar.
Step 3: Navigate to the page you want to take a scrolling screenshot. Click the screenshot icon on your toolbar, and then click Save Full Page.
3. Microsoft Edge
How to take long screenshots using Microsoft Edge? As mentioned above, Microsoft Edge includes an integrated feature that allows you to take long screenshots in the form of a scrolling screenshot. How to achieve that?
Click on the menu three-dot icon at the upper-right corner and select the Web capture. Then, you will see an overlay on your page with a couple of screenshot options.
Step 2: Select the option to capture a full page. A new scrolling window with a full page will become available.
Once you click the Save button, the the long screenshot will save itself to your Downloads folder.
Take Scrolling Screenshots Of Entire Web Pages On Mac For Free
If you have read our favorite macOS tips and tricks article, you know that you can use the keyboard shortcut CMD+Shift+3/4/5 to take a screenshot of a window or entire screen or record video with ease. However, one missing feature is the ability to take scrolling screenshots.
Shottr is a great screenshot app that offers this free feature. Download and usage of the app are free. The developer can be rewarded for making such a great app. Before we get to our guide, here are some of our favorite features of Shottr.
- Super-fast screenshot capture (even faster than native screenshots)
- Scrolling screenshots
- Delayed screenshots
- You can easily blur or hide sensitive information
- Text and QR codes can be recognized
- Built-in measuring tool to measure size between different UI elements
And the best part is that you can get all these features for free. To proceed with our guide, first, download and install Shottr on your Mac by using the link. Follow the instructions below to create a screenshot that scrolls to capture an entire website or any other content you desire on your Mac.
1. Launch the Shottr application on your Mac using Spotlight.
2. While it's not necessary, we recommend using the Setup Hotkeys button to set up a keyboard shortcut for scrolling screenshots.
As you can see I have set CMD+Shift+0 as a keyboard shortcut for taking scrolling screenshots.
3. You can also use the General section to set other parameters for your screenshots.
4. Shottr asks for permission when you first use the app. Open System Preferences, and give it permission to do so.
5. Open the page you wish to capture, and then press the hotkey. This will start the scrolling screenshot. You can also use the Menu Bar Icon to choose Scrolling Capture.
6. Click and drag the crosshair to set the width of the capture. Shottr now will prompt you to scroll automatically and take a screenshot. To continue, click the OK button.
7. Shottr automatically scrolled and captured the whole page for me. You can now crop, edit, and markup the screenshot as you desire.

You can take a screenshot of a scrolling screen on the iPhone
Your iPhone has a native tool that allows you to capture more than one frame in a screenshot, but unfortunately only works in mobile browsers. The tool will allow you to capture an entire website or article, but it won't function in social media or Messages.
While that's a bummer, this is still a great way to take full-page website screenshots without cluttering your iPhone with third-party apps.
- Click on a link in the mobile web browser.
- Press the volume up and side button simultaneously. (Or home and side buttons on an iPhone with Face ID if it doesn't have FaceID).
- Tap on the screenshot preview that appears in the bottom left corner. These previews disappear after a few moments, so be quick. If you missed it, take another screen shot and try again. Once the screenshot is sent to your camera roll, there's no way to alter it and make it a full-page screenshot.)
- Tap on "Full Page", which is located above the screen shot. Your preview immediately changes to show you the entire page. You can use the long bar on the right-hand side to scroll through your screenshot and use any of the native editing tools. It's not easy to edit screenshots in this app. We wish you could easily chop out sections of the screenshot you don't want to share, but the crop tool is not easy to maneuver.
- If you're content with your screenshot, tap the share icon in the upper right corner. This will bring up the normal share menu you're familiar with and you can send off your screenshot as a multiple-page PDF.